chronicles
|
Back in August of last year I wrote about my first experience of butchering the back half of a pig, which had been kindly given to us by a friend in the village. This year things got a lot more serious on the farm and it was time for us to complete the full cycle of life from birth to death for some of our animals. I had known that this day would come eventually, but it is a hard one to prepare for having no previous experience. Back in March it became very apparent that we had too many sheep (27 in total). This was after a successful lambing season, on top of the fact that we didn't sell or slaughter any of the previous year's lambs. They were eating us out of house and home (or at least all of our grass down to its roots). Something had to be done. The idea had always been to start eating our own meat. We thought it would be our steer (Stew) who would be first in the freezer, but he has a reprieve for another year. Not knowing the first thing about slaughtering, dressing or butchering livestock I called upon a local farmer (Farmer G) to ask some advice. He offered to come round and assist, an offer I took up straight away. I had completed our sheep yards earlier in the year so Niki and I were able to muster the sheep and separate out one of last year's wethers and return the rest of them to the paddock. I am not embarrassed to say that I thanked the animal for its life. We had been responsible for it from birth through to death. Warning: Graphic description of slaughter follows Farmer G and his wife came round on a Friday afternoon and I was all set to go. I had my .22 ready, sharp knives on the bench and plenty of nerves. Farmer G told me what to do and I got on with it. A clean shot to the back of the head at point blank range was enough to down the wether. Next was bleeding it out as soon as possible. This involved cutting the throat, ensuring the jugular was severed. During this there was quite a lot of reflexive movement and it was necessary to hold tight (by the way, there was absolutely no doubt the sheep was already dead). We then moved the carcass to the shed and began the dressing (skinning and gutting) process. Once we were at this stage, it was much easier to see the animal as future meat, not the same as the sheep that had been walking around only 10 minutes ago. We started cutting the skin at the knees (careful not to cut the tendons which are needed whole for hanging) and worked away (front and back legs). Hoisting the carcass to hang in the shed was an effort even with two of us and I promised myself I would purchase a pulley for next time. Once the carcass was hung it became much easier to separate the skin using a closed fist to punch down between the skin and the brisket. Apparently in abattoirs there used to be the job title of 'left handed brisket puncher' just for this task. Once the skin was removed all the way to the neck, the head was cut off and the head and skin/fleece were removed. I would, in future like to use as much of the animal as possible, but this time I didn't plan to save the skin. Next was removal of the offal, a task to be carried out carefully to avoid any contamination. All of the stomach, intestines, etc. went into a blue plastic bin for later disposal (great for worms). Then there were the heart, lungs and liver. I kept the very healthy looking liver. Niki and I had liver and onions for lunch the next day, it doesn't get any fresher than that. Once the dressing was complete the carcass was wrapped to keep the flies away and left to hang for a few days (being late summer a couple of days was enough, in winter it could easily hang for a week or more). Meanwhile Farmer G's wife was in the kitchen with an emotional Niki. I was exhausted! Of course, dressing the carcass is only half the job. Unless you are doing a spit roast it's a bit hard to fit a whole sheep into your oven! Luckily one of our near neighbours is a retired butcher and he had already offered to give me a hand turning my sheep into useful cuts of meat. A few days after hanging the carcass he came over to show me what to do. We spent a Sunday afternoon in the shed with a trestle table covered in plastic, a large piece of untreated eucalypt as a chopping board and lots of sharp knives, an axe and a machete. We turned the carcass into 26kg of recognisable cuts of meat - chops, roasts and shanks. I think I'll need a few more goes at it to get better and know what I'm doing, but I now have a grasp of the basics. I bagged up all the meat, weighed it and, except for a shoulder put it all in the freezer. Niki slow-roasted the shoulder the following week and it was truly delicious. What an amazing experience to have a plate of food in front of you where everything on the plate (4 vegetables and meat) came from our farm - that's why we're here. Since then I have slaughtered, dressed and butchered a lamb and taken 9 other lambs to the sale yards and sold them for a good price, we sold 2 others to neighbours. We are now back down to 10 ewes, almost manageable for the little grass we have left. Postscript: After packing and weighing the meat I calculated how much it would have cost to buy the same cuts at the supermarket using a well known supermarket website. The 26kg of meat would have cost me $467 at the supermarket. I could have probably sold the live animal for about $70-80. That tells you something straight away - somebody is getting well paid for meat - and it's not the farmer! Posted by Farmer Wan
3 Comments
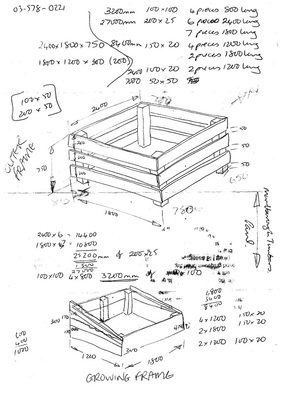
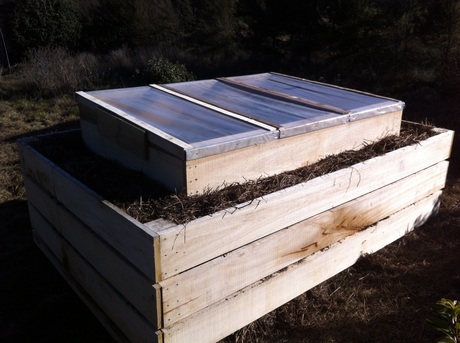
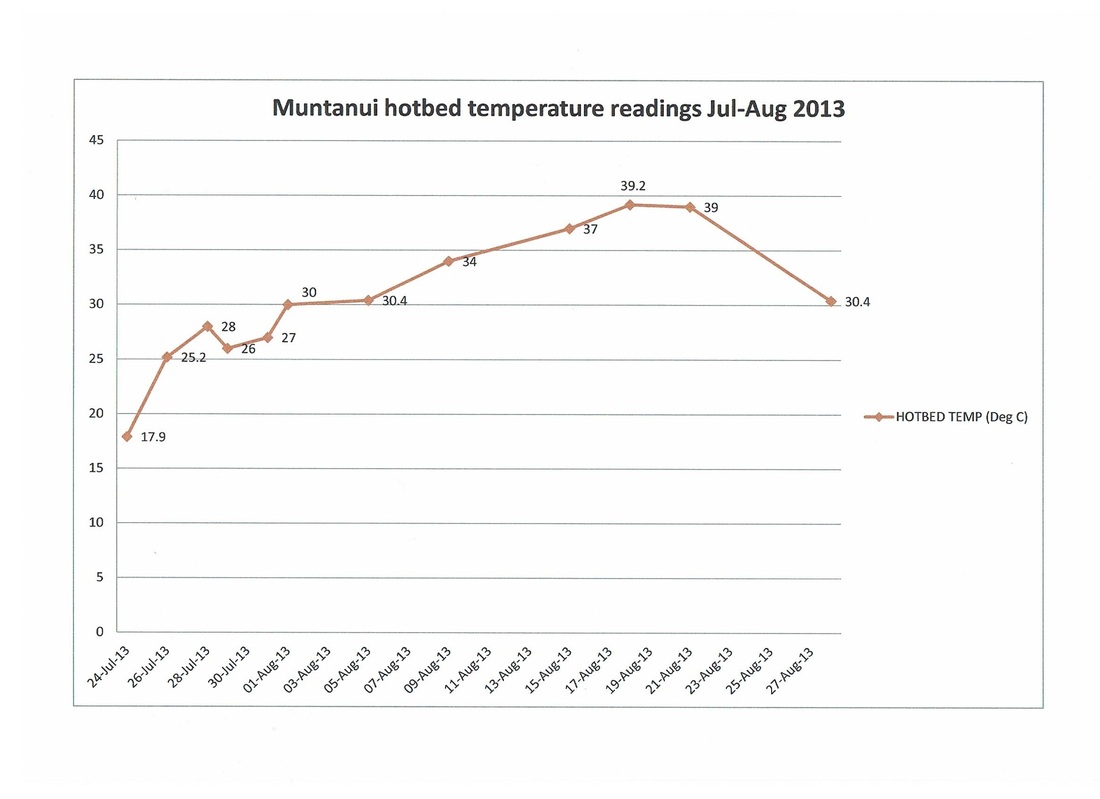
There are many different kinds of "hot beds" in the world and all sorts of instructions for "making" them but here I'm talking about using the heat generated by a compost heap to germinate seeds and grow plants very early in the season. Sorry. France: a hotbed of horticultural excellence I first read about hotbeds in The Winter Harvest Handbook by American organic market gardening guru, Eliot Coleman. He referred to the incredible 19th century market gardeners around Paris who used hotbeds to supply the city with fresh vegetables and fruit all year round These growers also exported vast quantities of produce over the pond to Britain. Each market garden was usually no bigger than one or two acres but they were very intensively cultivated and extremely productive. I filed this information away in the back of my head until the NZ Biodynamic Conference back in May, where I spotted Hot Beds, a great little book by British horticulturalist and hotbed expert, Jack First. There are detailed instructions in the book on how to construct, fill and maintain hotbeds and I thought I'd like to give it a try. (Translation: I bullied Farmer Wan into making one for me.)  Step-by-step instructions on how to build a hotbed 1. Build the outer frame The bigger the outer frame, the more raw material it will hold and the longer the hotbed will stay warm. Farmer Wan made ours from untreated eucalyptus, 2400mm long (the sun-facing side) by 1800mm deep (or 8 ft long by 6 ft deep). The height varied at each corner because the land was sloping but on flat ground, it would be 750mm (approx. 2 ft 5in). 2. Fill the outer frame to the top with manure mixed with straw Horse stable sweepings are best for this because horses produce copious amounts of nitrogen-rich urine, which is great for getting the composting process started. We settled for red clover straw, cow manure and Farmer Wan peeing on the heap whenever he felt the urge. 3. Build the growing frame This should fit comfortably inside the outer frame with room to spare. Farmer Wan made ours 1800mm long by 1200mm deep (6 ft by 4 ft). As you can see, it slopes. This prevents seedlings from being shaded out.  4. Make the lights These cover the growing frame and keep in the heat. They should extend just past the growing frame so that rain runs off and doesn't flood the seedlings. Farmer Wan made three separate, lightweight frames. Traditionally, these were covered with glass but he used polytunnel plastic to cover ours. 5. Fill the growing frame with growing medium We used a soil/compost mix with good drainage. 6. Monitor the temperature of the hotbed This was a good excuse to buy a great new gadget -- a digital thermometer with a metre-long probe. The hotbed temperature should be stable or starting to decrease before it's sown with seed. For the first couple of weeks, we took temperature readings every two or three days but we slackened off towards the end. It took a while for the bed to get cranking but at peak, it reached just under 40degC -- more than 20 degrees higher than the ambient temperature. 7. Sow seeds On 19 August, I made shallow furrows in the growing medium and filled them with seed-raising mix. I sowed three rows of lettuce, a row of English spinach and a row of corn salad (a.k.a. lamb's lettuce). On 24 August, I sowed four rows of a carrot/radish mix. 8. Water and cover with lights Once the seedlings are up, they need adequate ventilation. The lights should be raised on calm, sunny days to provide airflow, and replaced before the temperature starts to drop in the afternoon. I'll give you a progress update soon. Posted by Farmer Nik "Now that you've got a freezer, how would you like half a pig?" It's not something you hear every day but around here it's not that uncommon. A friend in the village with a bush block in the Marlborough Sounds shoots a lot of pigs and had offered me one before. I was unable to accept last time because we had visitors coming and no freezer. This time: no excuses. Those of you of a squeamish nature (or any vegetarians) may want to look away and avoid the remainder of this post. I collected the back half of the pig (minus the legs) and returned home to work out what I was going to do with the carcase. I set up our trestle table, covered it in plastic sheeting and found a suitable piece of surplus untreated eucalypt timber to use as a cutting board. I laid out two newly sharpened kitchen knives, a borrowed meat saw, found ziplock bags of a suitable size and stood looking at the bloody mess to work out where to start. Slicing between the ribs seemed to be a good way to go and once that was done it was a matter of using the meat saw to cut through the backbone. Not as easy as it seems, trying to hold on to a slippery hunk of meat sliding around the place, and sawing at the same time. Once that was done I started to see some recognisable cuts of meat - pork chops. I carried on slicing and sawing until all of the chops were done. I then found a couple of juicy looking tenderloins which I was able to cut off quite cleanly. The last pieces of meat worth taking from the carcase were a couple of what could be described as rump steaks, at least that is what I'm calling them. The sum total of the exercise was as follows:
Given that I have had no training or experience I was reasonably pleased with the results. We are yet to taste them -- that will be another post. Next time it will be a lot more real. I will be killing one of our wethers. I'll definitely need some assistance for that one. Luckily, one of our neighbours is a retired butcher and has offered to show me the ropes. Look out for another butchery post in the future. Posted by Farmer Wan
Yesterday, we received the verdict on this year's saffron harvest: Just a quick note to let you know that your 2013 saffron consignment arrived safely . . . Wow! It has to be the most vibrant looking saffron I've received this season. It really is stunning! We're still doing the happy dance. The 5,887 flowers we picked this year yielded a total volume of 40.95 grams of saffron, an increase of just under four times last year's harvest (10.4 grams). Mark, the guy we grow for and author of yesterday's email, had been hoping for more but said that it was probably a good result, given the regional weather conditions over the last six months. We'd been worried that we'd over-dried half of it. He said if anything, it was very slightly under-dried but near enough to spot-on. He finished with: Thank you for the excellent product you produced this year. It's a huge relief for us. Not only are we going to be paid but Mark's talking about popping down for a visit. It'll be nice to meet him, as we've only communicated by phone and email so far.
Needless to say, I'm very motivated to take extra-special care of our plants for the next season. With flowering over, the beds are full of foliage. This will die off in early summer, feeding the production of new corms, so now is the time to give the plants some extra tucker. I'll start with a bit of delicious worm wee and move on to comfrey tea in mid-spring. That'll make the little darlings' eyes water. Still on the subject of harvests, despite the drought conditions over summer and early autumn, our soil had improved enough in the vege garden to give us a small surplus of some veges to freeze: 1.5 kilos of bush beans, a couple of kilos of broccoli and rhubarb and 2.5 kilos of tomato pulp. The star, though, was this year's raspberry harvest: 13.8 kilos! If I could give any advice to a new grower, it would be this: count and weigh everything and keep records. It's the most tangible way of measuring your progress. And it'll remind you why you felt compelled to pay a small fortune for a bloody great chest freezer, just like we recently did. Posted by Farmer Nik Thanks to everyone who helped with harvesting and processing saffron (and raspberries!) this year. You made our lives a little easier and we love you for it. x |
About Ewan and NikiFarmer WanScottish mechanical engineer with a deep and abiding passion for good food. Outstanding cook. Builder of lots of stuff. Cattle whisperer. Connoisseur of beer. A lover rather than a fighter. Farmer NikKiwi writer and broadcaster who hates cabbage, even though she knows it's good for her. Chook wrangler. Grower of food and flowers. Maker of fine preserves. Lover of dancing and wine. Definitely a fighter. Archives
November 2016
Categories
All
|


 RSS Feed
